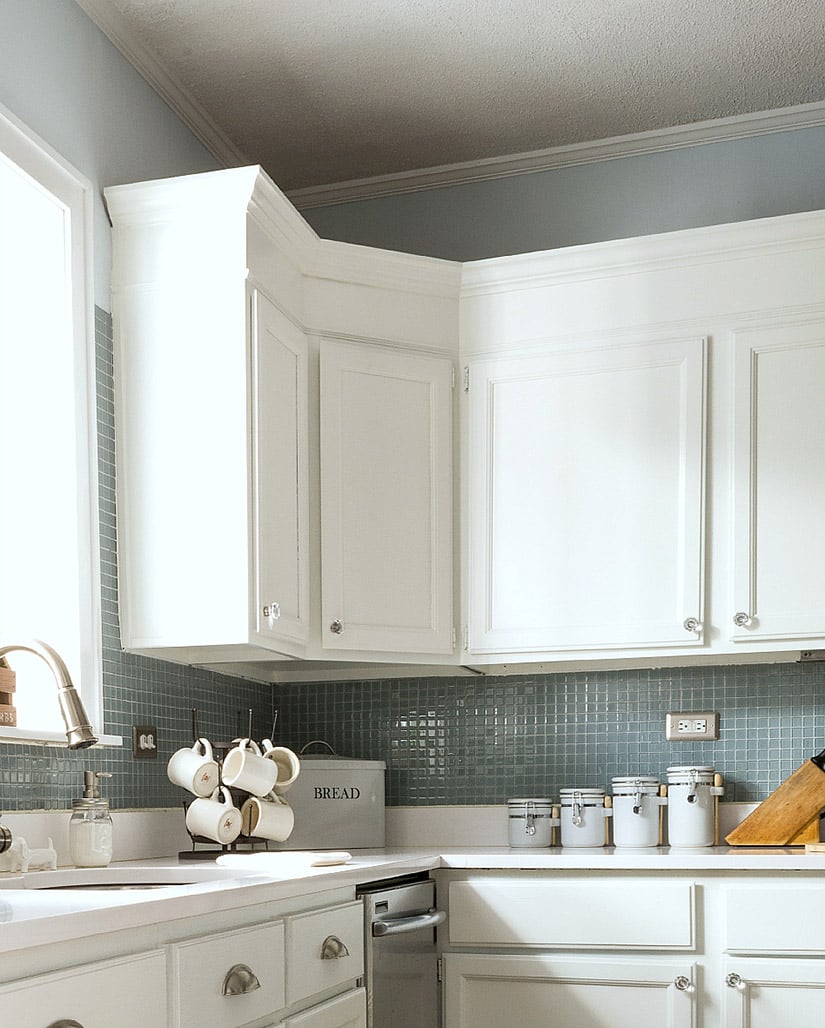
How Do You Put Crown Molding On Kitchen Cabinets / 9 Crown Molding Types to Raise the Bar on Your Kitchen Cabinetry / Empty space above cabinets is a common problem, because the distance fluctuates depending on ceiling height and cabinetry height.
How Do You Put Crown Molding On Kitchen Cabinets / 9 Crown Molding Types to Raise the Bar on Your Kitchen Cabinetry / Empty space above cabinets is a common problem, because the distance fluctuates depending on ceiling height and cabinetry height.. Be sure the pieces are tight against the wall. Miter that end of this strip and then attach it to the backing wood with the nail gun. Cut the wood structure (holder) pieces at the same exact angle as the crown molding (aka: You've heard the saying measure twice and cut once. Make sure the pieces are together and in place snugly.
One for each side of the cabinet, following your measurements. Crown mouldings on varying cabinet heights. Traditional crown molding tends to be the industry standard for kitchen cabinetry. You've heard the saying measure twice and cut once. Step 6 fill in the nail divots and joints
Update Builder Grade Cabinets Fast Without Painting from i2.wp.com Dry fit the crown molding by holding the front piece and a side piece against the front and side of the baseboard (image 1). Measure the area around the top of the cabinets where you will install the crown molding. Use a pin nailer to nail into the corners of the two pieces of crown molding (image 2). You can add molding to your cabinets in the same way you would install molding on your wall. Cut a molding strip at least 8 inches longer than the length of the front of your cabinet. If you google staggered cabinets you will see many examples of how the cabinets have to change in depth in order for the crown molding to die at the junction of the shallower and deeper cabinets, in order to avoid the returns that you had to have on your cabinets. Cut crown molding for kitchen cabinets cutting crown molding for topping kitchen cabinets tends to be easier than cutting it for walls, because, unlike most walls, the square angles on cabinets actually are square. When installing the top of a cabinet, space the finish nails about 12 to 16 inches apart.
Transfer the measurements onto the crown molding pieces with a pencil.
Start by assessing the cabinets. When installing the top of a cabinet, space the finish nails about 12 to 16 inches apart. From the sides of the cabinet, nail the filler pieces in the place. Empty space above cabinets is a common problem, because the distance fluctuates depending on ceiling height and cabinetry height. Once the cabinets are bought (or built) and installed your options are limited to the situation you have in front of you. Before nailing the kitchen cabinet crown molding pieces in place, test fit them to make sure the angles line up along corners. Unless there is ample room above the doors to attach a crown molding, or if you are using a very wide crown molding, you will need to install a nailer strip to support the installation. This means that there will be a little sliver of the unpainted piece of wood that will show through once the crown is added. Measure the area around the top of the cabinets where you will install the crown molding. You can use a finished filler or it can be touched up later. Fasten the crown molding to the top of the cabinet (we used a brad nailer). If you google staggered cabinets you will see many examples of how the cabinets have to change in depth in order for the crown molding to die at the junction of the shallower and deeper cabinets, in order to avoid the returns that you had to have on your cabinets. For the front filler piece, drill from underneath the inside of the cabinet, and then secure that piece with wood screws.
Add up all of the separate dimensions. This means that there will be a little sliver of the unpainted piece of wood that will show through once the crown is added. It's a good idea to cut the corner angles first, then measure the rest to fit. You've heard the saying measure twice and cut once. Moulding).usually the angle will be around 35 degrees.
How to Install Crown Molding On Cabinets that Do Not Go to the Ceiling in 2020 | Beadboard ... from i.pinimg.com Step 6 fill in the nail divots and joints Again, make sure to glue and nail the mitered corners and joints. You can use a finished filler or it can be touched up later. We didn't add skins to the sides of the refrigerator cabinet or the side of the wall cabinet. Here it has been used to fill an empty space between the cabinets and the ceiling. To successfully install crown molding on your cabinets, you need to make sure that you have the appropriate amount to do so. Once the cabinets are bought (or built) and installed your options are limited to the situation you have in front of you. Lightly sand the rough edges with sandpaper.
Start by assessing the cabinets.
Start by assessing the cabinets. You can also notch them so the bottom of the angle will sit completely flush with the front of the kitchen cabinets. Traditional crown molding tends to be the industry standard for kitchen cabinetry. Here it has been used to fill an empty space between the cabinets and the ceiling. Use a pin nailer to nail into the corners of the two pieces of crown molding (image 2). How to cut & install crown moulding. Cut the molding with a miter saw to the appropriate angle. The second trick is to set the molding against the saw and mark a line on the table with a pencil (image 2). Transfer the measurements onto the crown molding pieces with a pencil. Add up all of the separate dimensions. Fasten the crown molding to the top of the cabinet (we used a brad nailer). Cut the crown molding into individual pieces: Cabinet crown mouldings are the finishing touch for a kitchen renovation but you need to plan for them early in the project.
Why would you do that? Take your tape measure and get the dimensions of each cabinet. Using a nail gun, nail the crown to the baseboard. Miter that end of this strip and then attach it to the backing wood with the nail gun. Here it has been used to fill an empty space between the cabinets and the ceiling.
How To Install Crown Molding On Kitchen Cabinets from cdn.kitchencabinetkings.com Provide a nailing surface for crown moulding by attaching solid wood mounting strips to the top edges of the cabinets. Dry fit the crown molding by holding the front piece and a side piece against the front and side of the baseboard (image 1). You can use 1 x 4 lumber, and rip these into two or three strips. Measure and mark the front section of crown molding to the cabinet width. When installing the top of a cabinet, space the finish nails about 12 to 16 inches apart. (use one long strip for a row of cabinets the same depth.) then apply wood glue to each strip, nail it in place, and let dry. How to cut & install crown moulding. I attached the crown molding to the ripped down 1x6 with 3/4 brads.
Cabinet crown mouldings are the finishing touch for a kitchen renovation but you need to plan for them early in the project.
Before nailing the kitchen cabinet crown molding pieces in place, test fit them to make sure the angles line up along corners. Take your tape measure and get the dimensions of each cabinet. Cut the crown molding into individual pieces: Hold up the crown molding on the sides of the cabinet. In this video we will go over some tips and tricks that might help whe. For the front filler piece, drill from underneath the inside of the cabinet, and then secure that piece with wood screws. Once the cabinets are bought (or built) and installed your options are limited to the situation you have in front of you. Using cabinets of varying heights or landscaping as. Cut the molding the number one trick to cutting inside and outside corner crown molding is to cut each piece upside down with the ceiling side on the bottom and the wall side on the top (image 1). You can use a finished filler or it can be touched up later. I like to make the mark on the crown and then cut longer than needed, put the piece on the cabinet and then repeat until the fit is within 1/64″. Well, for crown molding it can pay to measure twice and cut four times. Cut at one mark, then move the molding along to the next mark.